Navigation
Sign In
Business
Client
Staff
Business / Instructor + About
A:
Bookamat gives you all the tools you need to create a thriving wellness business.
Affectionately known by our customers as "Booky" and "BAM", Bookamat is an easy-to-use, feature packed studio management platform designed to save time, generate revenue and grow your business.
It is trusted by a growing community of Pilates, yoga, barre, ride, HIIT, personal training, swim, corporate wellness and many other fitness and health professionals around the world.
Why Our Customers ❤ Us:
✅ Quick setup
✅ Easier to use than other systems
✅ More reliable
✅ Better looking
✅ Got all the features
✅ Students love using it
✅ More affordable
✅ Great support
✅ New features added regularly
✅ Saves time
✅ Grows their business
Business / Instructor + Activating Passes
A:
All newly assigned client passes or packs must be activated before they can be freely scheduled into classes or activities. Activation gives you more control over bookings and allows you to permit clients use their passes before you have collected their payment.
Passes can be activated in three ways:
1. Mark The Pass As Paid
On the Billing > Outstanding page, select the Payment Type in the Paid For With column and Save Changes. This will move the pass to the received payments page and activate the pass.

2. Set Pass To Activate
On the Billing > Outstanding page, select 'Options' > 'Activate' next to the pass you want to activate. Activating a pass allows the credits to be accessed and rescheduled, but does not mark the pass as paid. You will see an 'Activated' label next to the activated pass.

3. Online Payment Processing
If online card payment processing has been enabled on your account, (Billing > Payment Settings) clients can pay online and their passes will be automatically activated and moved to the received payments page.
Once a pass has been activated, you can also use 'Add Participants' to assign the additional credits into classes. When a client runs out of credits, you can simply assign them a new pass.
Business / Instructor + Adding Activities
A:
Before you can add an activity to your schedule, you must have added at least one service with a linked pricing.
Step 1. Go to the My Business > Schedule page and select 'Schedule New Activity'.

Step 2. Fill in the form for your new activity.

- - Do you want the activity to be public (for online bookings) or private (only you and the participants can see it)?
- - Select the service the activity is for, note that the pricing for this services is displayed at the bottom.
- - If applicable set the activity recommended experience level.
- - Set the instructor who will be teaching the activity, notice the list is limited to the staff who are linked to this service.
- - Set the location where the activity will be held.
- - Set the maximum number of spaces that are available for this activity.
- - Set the number of waiting list spaces you want available for this activity.
- - Set the start date and time duration for this activity.
- - Set whether the activity is recurring or once off.
- - If recurring, choose the days it should be repeated on and then save!
If you can't see an instructor in the list, please ensure the staff member has been linked to the pricing on the Service Manager page.
Step 3. Voila! Your new activity has been scheduled and ready to accept bookings.

Related Documents:
Business / Instructor + Adding Clients
A:
There are two ways to add new clients.
The Clients Page
1. Go the My Business > Clients page
2. Select 'Create Client', fill in the form and then save.
Note that adding the DOB (date of birth) for a client will send the client a birthday greeting on behalf of your studio. Greeting: "Wishing you a special day full of all that brings you joy! Happy birthday from us all. Your Studio Name."
Add Participants (when adding new participants into an activity)
1. Go the My Business > Schedule page
2. Select Options > Add Participants
3. Enter the new client name into the search box

4. Fill in the form and then save / create new client.

Business / Instructor + Adding Instructors
A:
Step 1. Go to the My Business > Staff page and select 'Create Staff Member'.

Step 2. Fill in the form then save. Note that if the staff notifications option is set to yes, the staff member will receive email notifications about the classes they are teaching such as new bookings and cancellations.

Step 3. That's it. Your new staff member has been created. You can edit the staff member details by selecting Options > Edit Staff Member.

Note that before you can assign a staff member to an activity, you will need to link them to a service by clicking on the 'Assign Services' button (next to Create Staff Member).
Related Documents:
Business / Instructor + Adding Schedule To Website
A:
Sure. You can get the link to specific credit packs by going to My Business > Service Manager > My Services and choosing Edit > Copy Link. Then you can use that link on your website to direct visitors straight to buying the pass.
A:
Step 1. Ensure you have added at least one activity to display within the next 7 days.
Step 2. Go to the Settings > Links page and copy your live schedule link.

Step 3. Check the link by firstly signing out from your Bookamat account, then pasting it into your web browser. Your live seven day schedule should be displayed.
Step 4. To embed the schedule into your own website you can use the following iframe code replacing the "your live schedule link" with your own link between the "".
<iframe src="your live schedule link"
width="100%" height="900"
frameborder="0"></iframe>
Or if using GoDaddy try using:
<iframe style="width: 100%; height: 1000px;" src="your live schedule link"></iframe>

If you need assistance with getting the live schedule to work on your website please contact us.
A:
Yes. You can modify the following elements of your live schedule. More customisations will be coming soon.
1. Button Colour: Go to Settings > Links to modify the button colour.
2. Days Displayed: Add: ?days=30 to the end of your live schedule link to show 30 days, e.g. https://bookamat.co/embed/schedule/mystudio?days=30
3. Hide Filters: To hide the drop down filters (Services, Locations & Teachers) add: &filters=none
4. Hide Columns: To hide the 'Level' and 'Spaces Free' columns add: &columns-hidden=level,spaces
5. Select Tabs: To show the Browse Schedule, Browse Packs & Events & Workshops tabs add: &tab=all. To show Browse Schedule only add: &tab=browse
6. Show Locations: To show specific locations only on the Browse Schedule tab, add: &location=location-name. Location-name should be the name of the location you want to show (in lower case and a hyphen (-) to replace blank spaces.
7. Show Instructors: To create a calendar which shows only one instructors classes and hides the others, add: &filters=none&staff=[staff-id]. To obtain the staff-id go to the My Business > Staff page, select Options > View Account for the staff member and in the browser URL you will find the staff's ID. For example, /business/client/91/outstanding is staff ID 91.
An example for showing 30 days and hiding the Free Spaces and Level columns would be:
https://bookamat.co/embed/schedule/mystudio?days=30&columns-hidden=level,spaces
A:
Sure you can!
Step 1. Go to Settings > Notice and enter in the text your want to display.
Step 2. Set the colour schedule and date / time you want to show the notice from and to then enable it.
Step 3. Your notice will be added to the top of your live schedule page and in the client app.
It's a great way to let your clients know about new class times or upcoming events etc.
Business / Instructor + Assigning Passes
A:
Assigning a new class pass or pack to a client can be done quickly and easily in Bookamat in one of two ways.
1. Assign Passes by Start Date
Firstly you can assign a new pass directly from the schedule by selecting 'Assign New Pack' and completing the form. This method allows you to choose any date to start the pass from.

2. Assign Passes by Class
Secondly, you can also assign passes by choosing a class. This method will automatically deduct a booking from the client's pass which is a great way to get clients off and running.
What's also great about this method is that if you are using our unique weekly pricing plan, you only need to assign a client into their starting class and Bookamat will replicate them in all classes in that series forever more!

New passes must be activated before they can be freely used.
Business / Instructor + Auto Debit
A:
Clients can enable auto debit from within their Bookamat account or app. When enabled, their bank card will be automatically debited whenever the next recurring payment is due. This added convenience ensures clients always have a valid pass.
An automated email notification will also be sent to pre-warn clients 48 hours before their card is due to be debited. If an auto-debit card payment fails, we'll try again in 24 hrs.

Business / Instructor + Billing
A:
Bookamat provides businesses with a powerful billing system to help track and collect payments and much more!

1. New purchases automatically added as outstanding amounts due
2. 'Total Due' displayed to help you forecast upcoming months revenue and/or track unpaid amounts
3. Send invoices to all clients who have outstanding amounts due with the click of a button
4. Preview and/or send invoices for individual clients
5. Manually record payments received from clients, e.g. via bank transfers or cash etc
6. Recurring passes automatically generated and added as outstanding payments (including weekly reservation)
7. View and track the number of minimum commitment payments made and remain for each client
8. View and track the number of recurring payments each client has made
9. Manually activate purchases to allow the bookings to be used prior to payment confirmation
10. Write off payments
11. View each client account in detail
12. Purchases paid via online credit / debit card are automatically confirmed and moved to the received page
We also provide detailed reporting on revenue and staff income from the Reports page.
A:
Sure! If you have wrongly saved a payment against a client's account you can revert the payment from the My Business > Billing > Received page. Reverting will also revert the credits.
Note that reverting only affects the record of the transaction and not the actual funds.
Business / Instructor + Booking Discounts
A:
The best way to give new clients discounts is to use discount coupons (Settings > Discount Coupons). These can be created for new clients only.
A:
Absolutely.
Bookamat provides businesses with exciting ways to offer discounted rates to reward clients and to help generate new bookings.
Business / Instructor + Bookings
A:
The choice is yours. If you want clients to pay before attending classes, Bookamat can help you collect payment before releasing client bookings. Or if you want to allow clients to pay after attending classes, Bookamat lets you to "activate" client bookings, releasing them for scheduling, so you can take payment later.
Related Documents:
A:
Absolutely! Bookamat gives businesses complete control over all their client bookings. Whenever you add a new booking for a client on their behalf, they will also see the booking in their account.
A:
1. Go to the My Business > Credits page
2. Select Options > View All Credits for the desired client
3. Then choose Options > Schedule Credit
4. This page will allow you to schedule multiple credits for the client into multiple classes at once
Business / Instructor + Business Closure & Holidays
A:
Business closure and/or staff holidays dates and times can be set from the My Business > Service Manager > Holidays page. Scheduled activities which fall during a set holiday or closure period will not take client bookings.
Step 1. Select the 'Add New Holiday' button on the Service Manager > Holidays tab.

Step 2. Fill in and save the form. You can set a total business closure (i.e. for a public holiday) by selecting 'All Staff'. Otherwise you can set holidays for specific staff who won't be available to teach.

Step 3. Visit your schedule and you will see the activities are now tagged as 'Closed / Holiday'.

Remember to add your business closures well ahead of schedule!
Business / Instructor + Cancelling My Account
A:
You can cancel your account from the My Account > Account Info page of your business account. Select the 'Deactivate Account' button.
Business / Instructor + Changing Instructors
A:
Changing the instructor or teacher for any activity can be done swiftly from the Schedule page.
Step 1. Select 'Options' and choose 'Edit Activity' for the desired activity.

Step 2. Select the replacement staff member from the 'Instructor' drop down and then save. Note that if the staff member is not shown, you will need to add them first. On save you will be asked if you want this change to be for this activity only (once off replacement) or all upcoming activities in this series (permanent replacement).

Related Documents:
Business / Instructor + Classpass or FitKey
A:
Absolutely.
If you use a 3rd party booking service like ClassPass or FitKey etc, you can easily reserve them a space in your classes by creating one or more fictional clients such as "Class Pass 01" or "Fit Key 01".
At any time you want to allow a full paying client to take a spot reserved for ClassPass, simply remove the ClassPass client and move the full paying client in. Easy!
Business / Instructor + Client Accounts
A:
Bookamat provides your clients with their own accounts. Each client account is easy to use and provides access via mobile, tablet or desktop, to your schedule and their bookings.

Clients can browse for a class that suits their schedule without needing to contact you.

They can buy a new class pass or schedule a pre-paid credit to secure a spot.

If buying a new pass, the pass will be added to the clients basket requiring payment before confirmation. You can choose what payment options to provide your clients with including online card payments for instant booking confirmation.

Confirmed bookings are then displayed on the My Bookings page where they can be rescheduled, moved to credit (if enabled) or cancelled.

Clients can also use their accounts to:
1. Join waiting lists
2. Set upcoming class reminders
3. Set reminders about expiring credits
4. Download their upcoming classes
5. Add bookings to Google calendar
6. Contact your studio
7. View their attendance/booking history
8. View their payment history
9. Upload a profile photo
When you register for a business account, you can also use your business account login details to access your own client account to experience what your clients will experience.
A:
Clients can access their bookings via their client account which they can register for in the following ways.
1. Invitation
If you have already loaded your clients into your business account then you can select ‘Edit’ > ‘Send Invite’ to invite individual clients. Or you can select 'Email Options' > 'Invite All Clients' to invite all your clients. Client will receive an email invitation to confirm their account with you. You will be notified whenever a new client registers with your business plus you will see their registration date on your My Business > Clients page.

2. Live Schedule
If the client hasn’t already been added to your client list and you don’t have time to add them, you can direct them to your live Bookamat schedule and ask them to book a class or register. Once they book they will be asked to confirm their account and on confirmation will then be added to your clients list.
3. Find My Studio
Clients can click on the 'Find My Studio' link at the top Bookamat homepage to locate and then join your studio. Note: to be found, you must have published your business from the Settings > Booking Conditions page.
When you add a client into an activity you can send them an invoice which contains instructions on how to register their own client account at your business. Most client notifications will also include a link for clients to register at your business too.
You can always send an email to your clients directing them to register with your business using your unique Bookamat business registration link found on the Settings > Links page.
A:
Yes. If you've already registered and confirmed your business account, you can use the same details to sign in as a client.
A:
Sure! Bookamat lets your new clients add their referral source (friends name etc) on their registration form. You'll receive an email from us whenever a new client registers at your studio which will includes their referral source.
Plus you can also view, add or modify the referral for any client from the My Business > Clients page. You can even generate a Client Report and export it to see each client's referral so you'll be able to reward those who give you the most referrals!
A:
Clients can upload their profile photos by going to My Account > Profile. When a profile photo has been uploaded then you will see it displayed on your My Business > Clients or Staff page.
If a client hasn't uploaded a profile photo then a generic profile icon will be shown. You can change the generic icon to a male or female icon by changing the client's gender setting.
Business / Instructor + Client Activity Tracking
A:
Bookamat helps you track all client activity with your business including when they register, book, reschedule and cancel etc.
1. Client Accounts
Each one of your clients will have an account page to help you track their outstanding payments, received payments, upcoming bookings, booking history, notes and more.

2. Client Activity Tracker
You can also view every interaction your clients have with your studio though Bookamat in a single chronological view. This fun feature also helps to show you just how much time Bookamat can actually save your business!

3. Email Notifications
Email notifications can be enabled so that you always know when a client joins you on Bookamat, pays or joins a class etc.
Business / Instructor + Complimentary Credits
A:
Complimentary credits provide a quick way to assign clients with credits without billing the client. You can assign up to 20 complimentary (or free credits) per client at a time. Complimentary credits have the same conditions as normal bookings, e.g. they can only be used for the services you have connected.
To assign complimentary credits to clients, go to the My Business > Credits page and select 'Assign Complimentary Credits'.
Business / Instructor + Connected Services
A:
Connecting two services together allows clients to buy bookings for one service (e.g. Yoga) and reschedule them into other services (e.g. Pilates) and/or vice-versa. You can also connect between locations and set up connections for one way use (e.g. Pilates to Yoga only) or two way use (e.g. Pilates to Yoga, and Yoga to Pilates).
So when you add a new service which should share bookings with your existing services, remember to connect it to your existing services AND connect your existing services back to the new service.
Benefits Of Connecting Services:
✅ Gives you greater control over bookings
✅ Helps fill new or less popular classes
✅ Gives clients more options when rescheduling
✅ Connect services at different locations
✅ Connect one to one, one to many, or many to many
Benefits For Clients:
✅ Gives clients more options when rescheduling
✅ Allows clients to try different classes
✅ Gives clients more value for money
✅ Clients can visit multiple locations
A:
Step 1. Go to My Business > Service Manager > My Services
Step 2. Select 'Options' for a service you want to connect and choose 'Connect Services'

Step 3. Ensure the primary service is displayed in the drop down box and then put a check next to each other service you want to connect it with. Note the "Primary Service" is the service which the booking is for, and the "Connect To" services are the services where those bookings can also be used in.

Step 4. Save and then repeat steps 2 - 4 until your services are connected to and from each other then close the 'Connect Services' page.
Business / Instructor + COVID-19 Resources
A:
What can fitness studios and gym expect in 2021?
https://blog.bookamat.co/what-can-fitness-studios-and-gyms-expect-in-2021/
Boost your studios clientele despite COVID-19
https://blog.bookamat.co/boost-your-studios-clientele-despite-covid-19/
How fitness studios can adapt to a post-COVID-19 world
https://blog.bookamat.co/how-fitness-studios-can-adapt-to-a-post-covid-19-world/
Meditation during COVID-19 can relieve anxiety
https://blog.bookamat.co/meditating-during-covid19-can-relieve-anxiety/
What is it like to re-open after lockdown?
https://blog.bookamat.co/what-is-it-like-to-re-open-after-lock-down/
How to use Zoom with Bookamat
https://blog.bookamat.co/how-to-use-zoom-with-bookamat/
Tips for streaming your classes online
https://blog.bookamat.co/top-tips-for-streaming-your-classes-online/
Are you ready for class streaming?
https://blog.bookamat.co/are-you-ready-for-class-streaming/
Inspiring stories from studio owners during COVID-19
Meet Liezl Hoving, online yoga teacher
Meet Clarisa Strack van Schyndel from Coco Pilates
Adapting To Change: Divine You Yoga Studio
Meet Cherise, Owner Of The Callanetics & Barre Studio
The Nest Space: Holistic Wellness in an African Context
Bounce back after lockdown with fun Rebounding classes!
Health Warriors, Uplifting South Africans Through Wellness
Take your yoga to the next level with Jim Harrington
Business / Instructor + Creating Pricing
A:
Step 1. Go to the Service Manager > My Services page and select 'Create New Pricing'.

Step 2. Ensure the service you want the new pricing created for is selected. Then complete the form for the pricing type you want to create.

Step 3. That's it. Your new pricing has been created and is ready to be sold for your service.

Related Documents:
A:
To charge new clients a once off registration fee, follow these steps:
1. On the Service Manager page create a new 'Credit Pack' pricing for the desired service
2. Set sell online to 'No' since you will need to assign it to new
clients
3. Set pricing name to: 'Registration Fee' (or similar)
4. Set recurring to: 'No'
5. Set pack size to: '1'
6. Set valid from to: 'Date Of Payment/Activation'
7. Set valid for to: 'No expiry'
8. Set rate as required
9. Set staff to all, or as required
Now you can go to the My Business > Schedule page and select 'Assign New Pack'
to assign a Registration Fee pricing to any client's account.
Business / Instructor + Credit Expiry Dates
A:
Step 1. Go to My Business > Credits and select Options > View All Credits for the clients whose credits you want to edit.
Step 2. On this page, choose Options > Modify Expiry Date and edit as needed.

You can modify the expiration date of individual credits, or all credits linked to a client's pack.
Business / Instructor + Different Staff Pricing
A:
Here's how to set up different pricing for different staff who teach the same service.
Step 1. Go to the Service Manager > My Services page and select 'Create New Pricing'.
Step 2. Making sure the desired service is selected, fill in the form and set the rate for the desired staff member / instructor and save (Create New Pricing).

Step 3. Repeat step 2 but this time set the new rate for the other staff members / instructors.

Voila! You have just created two different pricing for two different staff members for the same service.

Step 4. When you next add this service to your schedule, choosing the instructor for the activity will also set the activity pricing for that instructor.

You can also prevent (or allow) clients from rescheduling their bookings between staff members from the Settings > Booking Conditions page.
Business / Instructor + Discount Codes
A:
Whether you offer the first session for free to new clients or want to run a winter session special, discount coupons are a great way for businesses to generate more bookings and/or reward client loyalty.
They are simple to set up and, when shared, can be used by new or existing clients to discount the cost of their bookings when they pay online.
There are no limits to the number of coupons you can create and you can also track and limit their usage. View our YouTube help tutorial on discount coupons.
Business / Instructor + Events & Retreats
A:
Step 1. Go to the My Business > Service Manager > My Services and choose 'Create New Service'.
Step 2. Complete the form selecting Event, Workshop or Retreat from the Activity box, then save.

Step 3. Now select 'Create New Pricing' and complete the form using Drop In or Pack (for 1 booking) for the pricing type then save.

You can also create more than one pricing for your event or workshop. For example you might want to sell early bird tickets (see below).

Step 4. Your event or workshop will now be shown with the pricing you have created. To prevent any tickets from being sold online (e.g. to stop sales of the early bird tickets) go to the My Business > Service Manager > Price Editor and toggle the 'Sell Online' setting.

Step 5. Now it's time to add your event or workshop to the schedule. To do this go to My Business > Schedule and choose 'Schedule New Activity'. Fill in the form and save. Note if you are holding the event at another location, you will need to create that location by selecting 'Add New Location' under the Where field.

Step 6. Voila! Your workshop or event is now in the schedule and ready to accept bookings. You can add participants using the Options > Add Participants buttons.

Choose the payment plan for the client/s then save to add them and create an outstanding amount / invoice on the Billing page.

Clients can also book themselves into the event or workshop by signing into their own accounts and searching for the event.

They can choose from the payment plan options which you have set to sell online. You will be notified when a new booking is made.

To start generating bookings, why not share your event on social media using Bookamat integrated social sharing to Facebook or Twitter?
Business / Instructor + Free Activities
A:
Easy! Simply create or edit a pricing and set the rate to zero! Free bookings will be automatically and immediately confirmed!
Business / Instructor + Friends & Family
A:
Client Accounts
Clients can sign in and go to My Account > Relationships to add their friends or family members. Clients who add relationships become the payee for those relationships and new relationships will be added to your client list.
Business Accounts
Businesses can sign in and go to My Business > Clients > Options > View Account > Relationships to view and create relationships for clients.
Payees will be shown on your My Business > Billing > Outstanding page with an * in front of their name. Opening their account will show you who they are buying a new pass or pack for.
On pack activation / payment, credits will be assigned to the attendee and you will be able to schedule credits for the attendee as you would normally.
A:
Yes. Clients can make bookings and pay on behalf of their friends and family members.
A:
Sure! By default Bookamat requires clients to buy a new pass for their friends of family members in order to book on their behalf. However if you want to allow clients to use their own credits to book on behalf of their relationships, go to Settings > Booking Conditions and enable the ‘Allow clients to use their own credits…’ setting.
Business / Instructor + Getting Started
A:
Simply register your business and confirm your account and we'll send you all the information you need to get up and running.
A:
Yes. You can download our detailed business and client user guides after registering.
A:
We offer a self-guided demonstration at https://bookamat.co/demo
If you would like more information on how Bookamat can work for your business please contact us and we'll be happy to assist.
Business / Instructor + Health Questionnaires
A:
Sure! You can add a link to your own online questionnaire (e.g. Google Forms) which will be sent to your clients when they register. If you prefer you can also upload a document (e.g. PDF) which clients can fill in and return to you.
To add a link to your own health questionnaire (or upload your form) go to the Settings > Documents page of your business account.
Business / Instructor + Hiding Online Pricing
A:
To hide any pricing you have created from the public, go to the Service Manager > Pricing Editor page and toggle the 'Sell Online' switch to 'No' then save. You can also set pricing to not sell online when you create it, or by editing it.

Business / Instructor + Importing Data
A:
If you are moving across from another booking platform such as MindBody online, please let us know via email or live chat so that we can assist you make the transition with a minimum of fuss.
A:
To import a batch of contacts into Bookamat please follow these instructions.
Step 1. Download our client import template here: https://bookamat.co/uploads/csv/client-import-template.csv
Step 2. Open the client import template file and add your contacts using the predefined columns, then save the file as a "CSV (Comma delimited)" format. Note that you can import a maximum of 1000 clients at a time, plus every contact should have at least a name and an email address.
Step 3. While logged into your Business Account, go to My Business > Clients.
Step 4. Select Import Clients.
Step 5. Select the client import file you just saved.
Step 6. Click on Import Client List and wait for the file to be imported.
Here is an example of how your data should look in the template for a successful import. Note you must keep the first row headings and dates must be formatted as dd/mm/yyyy (e.g. 01/01/1990).

Alternatively you can always send an email to your clients directing them to register with your business using your unique Bookamat business registration link found here: My Account > Links. If
you are still having trouble importing your client list please send us a
message so we can help.
Business / Instructor + Instructor Accounts
A:
Indeed! Each staff member in your account can have their own instructor account and login. Instructor accounts can view:
✅ Upcoming activities which they are teaching
✅ The confirmed bookings for each upcoming activity which they are teaching (including who has paid and who hasn't)
✅ The attendance form for upcoming activities
✅ Their personalised payroll report
✅ Their client activity stream (shows instructors if their clients have booked, rescheduled, paid, etc)
To invite your staff to create their own instructor account go to My Business > Staff > Options > Instructor Login and follow the prompts.
Note: If your staff member already has a client account they can use their client account login details to sign in as an instructor.
Business / Instructor + Integrations
A:
Mailchimp is one of the worlds most popular email marketing platforms. It is easy to use, free for up to 2,000 contacts and 10,000 sends per month, and provides tools for creating engaging newsletters, drip campaigns and more.
To link your Mailchimp account with Bookamat go to My Business > My Account > Mailchimp and select ‘Connect Mailchimp Account’. Then follow the prompts.
Once connected, your Bookamat client list will be synchronized with your Mailchimp list at a rate of 20 contacts every 10 minutes. You can check the synchronization status on the Mailchimp tab under My Account. Contacts will appear in your Mailchimp account with the tag ‘Bookamat’.
Whenever a new client registers with your business on Bookamat, or edits their information, their details will be automatically synchronized with your Mailchimp account.
A:
Bookamat is integrated with Stripe payments for customers in 42 countries around the world.
If you have a Stripe payments account you can connect it to Bookamat as follows.
Step 1. Go to your My Account > Stripe Integrations page
Step 2. Select 'Authorise Access..."
Step 3. Follow the prompts
Once your account has been authorised, online payments for bookings will be transferred directly into your Stripe account within 2 - 3 business days.
Bookamat deducts a 0.30 (local currency) per transaction. Please check Stripe's website for their pricing / fees.
A:
Bookamat is currently integrated with Square payments for customers in Australia only.
If you have an Australian Square payments account you can connect it to Bookamat as follows.
Step 1. Go to your My Account > Square Integrations page
Step 2. Select 'Authorise Access..."
Step 3. Follow the prompts
Once your account has been authorised, online payments for bookings will be transferred directly into your Square account within 2 - 3 business days.
Bookamat deducts a AUD 30c per transaction. Please check Square's website for their pricing / fees.
Business / Instructor + Invite Clients
A:
Here are a few ways you can invite your clients to start making bookings at your studio using Bookamat.
1. Send Client Invites
Send clients an email invitation to join you on Bookamat by going to My Business > Clients and select 'Options' > 'Send Invite' or 'Email Options' > 'Invite All Clients'. Once accepted, your clients will be able to sign in, view and manage their own bookings with your studio. NB Email Options > Invite All Clients is only available if you have 1000 or less clients.
Have a client list you want to import? Contact us and we'll set it up for you.
2. Your Live Schedule
Display your live schedule on your website by going to Settings > Links and embedding the schedule link into an iFrame on your website. Or link to it from your 'Book Now' Facebook button. This allows visitors to your website to see your upcoming activities and book into any available spot within the next 7 days.
3. Client Registration Link
Email a link to your clients so they can register with you on Bookamat by going to Settings > Links and sharing the unique registration link with them. This is useful if you already have a large number of clients who you want to invite to Bookamat.
4. Find My Studio
Clients can click on the 'Find My Studio' link at the top of our homepage to get connected to your studio. Note: you must have published your business from the Settings > Business Conditions to be found on the Find My Studio page.
5. QR Registration Brochure
Our QR Registration Brochures allow visitors to scan a QR code using their phone and register with your studio on the spot. To receive your unique QR Registration Brochure please contact us.
6. Social Media Sharing Link
You can easily promote an activity (e.g. class or event) on your social media channels to attract bookings using Bookamat. From the Schedule page, select Options > Manage Participants then click on the 'Share Activity' button. Clients will be able to register during the booking process.
Business / Instructor + Invoicing
A:
Sure! Past invoices can be searched for and downloaded from the Reports > Invoice Search page of your business account.
A:
To preview the invoice a client will receive:
Step 1. Go to the My Business > Billing page.
Step 2. Go to the ‘Outstanding’ list.
Step 3. Select ‘Options’ next to the client you wish to preview the invoice for.
Step 4. Select ‘View Invoice’.
To send an individual client their invoice:
Step 1. Go to the My Business > Billing page.
Step 2. Go to the ‘Outstanding’ list.
Step 3. Select ‘Options’ next to the client you wish to invoice.
Step 4. Select ‘Send Invoice’ or ‘Resend Invoice’ if an invoice has previously been sent.
To send all your client invoices at once:
Step 1. Go to the My Business > Billing page.
Step 2. Go to the ‘Current’ list.
Step 3. Select ‘Send All’.
Step 4. Wait for the page to indicate that the invoices have been sent successfully (may take up to a minute).
A:
A:
Yes you can! Your logo can be added from the Settings > Logo page.
A:
Yes you can! Go to My Account > Account Details to add your business practice number.
A:
Yes you can! To add Sales Tax (VAT or GST etc) go to Settings > Sales Tax and enter the % to apply.
A:
Yes you can! Bookamat displays a billing history for each client which you can view from their account page.
Business / Instructor + Linking Staff To Pricing
A:
New staff members must be linked to a service before they can be assigned to an activity in the schedule. Here is how to link them.
Step 1. Go to the My Business > Staff page and select 'Assign Services'.
Step 2. Select the staff member who is new, and assign them to the services they will teach.
Step 3. Select 'Assign To Staff' to save.

You can also visit the Service Manager > My Services page to see which staff are linked to which services (see example below).

A:
If you want to link a staff member to a specific pricing in a service then follow these steps.
Step 1. Select the Edit button against the specific pricing you want the new staff member linked with and choose 'Modify Staff'.

Step 2. Select the staff member to link to the pricing and select 'Add Pricing'.
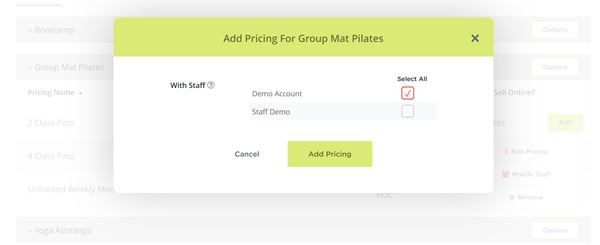
Repeat steps 1 and 2 for each pricing the staff member should be linked with. Once you are done, the Staff column will show which staff are linked to which pricing.

Related Documents:
Business / Instructor + Linking to Facebook
A:
You don't need a website to take live bookings with Bookamat. Using Facebook, you can link your Bookamat live schedule to your 'Book Now' button allowing your clients to easily can make bookings.
Step 1. Go to your Facebook business page.
Step 2. Click on the the blue 'Book Now' or 'Learn More' action button edit icon.
Step 3. Select 'edit button'
Step 4. Ensure the button is set to 'Book Now'
Step 5. Select 'link to website'
Step 6. Enter/paste your Bookamat live schedule link (found on the Settings > Links tab of your business account)
Step 7. Save and then test your button :)
Business / Instructor + Linking to Instagram
A:
Business / Instructor + Locations
A:
A location in Bookamat is a space where an activity is held and allows you to run concurrent activities or classes.
For example, you may have two rooms each running an activity at the same time. Alternatively you might have some sessions in a private room or in another location entirely.
Having different locations allows your clients and staff to see exactly where their activity will be held to prevent confusion.
A:
Unlike other booking systems there are no limits on the number of locations you can have in Bookamat.
Business / Instructor + MindBody Online
A:
Bookamat was built for people who are discontent with, or unable to afford, MindBody Online. We offer premium scheduling software with all the essential features you need to run and grow your studio without the big price tag.
If you are looking for user-friendly, reliable studio software which is affordable, has no lock in contracts and makes running your studio a breeze, we think you've come to the right place.
Migrating from another software? Contact us and we'll be glad to assist.
Business / Instructor + Minimum Payment Commitments
A:
Step 1. Go to My Business > Service Manager
Step 2. Select 'Create New Pricing'
Step 3. Choose 'Weekly Reservation' or 'Class Pass' pricing type with recurring set to 'Yes'
Step 4. Fill in the form and specify the minimum number of payments a client must make before they can cancel the recurring plan
Step 5. Select 'Create New Pricing' to save and close
A:
Setting the minimum number of payments a clients must commit to when buying a recurring class pass or weekly reservation membership, makes the following happen:
- - Clients can't cancel their plan until the minimum number of payments have been made.
- - If a client wants to cancel, they must contact your studio/business which can cancel or freeze the plan.
- - Clients and the business can view how many payments a client has made / has remaining.
- - Works on all recurring pricing plans.
- - Works with all payment types (credit / debit card, cash and EFT etc).
Business / Instructor + Modifying Activities
A:
Any activity (class, session or event etc) can be modified from the Schedule page as follows.
Step 1. Locate the activity on the Schedule page
Step 2. Select Options > Edit Activity
Step 3. Modify the details as needed (date, time, instructor etc) and save
Step 4. You will be asked if you want to save the changes for that individual activity or all activities in that series
Business / Instructor + Modifying Pricing
A:
Step 1. Go to the Service Manager > Price Editor page.
Step 2. Edit the desired pricing by touching or clicking in the rate field and changing the value.
Step 3. Save the changes.

Note that the pricing changes will only affect new bookings for the upcoming month.
Related Documents:
Business / Instructor + Not For Profit
A:
Sure! If you run a not-for-profit (NFP) organisation (church or charity etc) and want to use Bookamat for bookings, you may be eligible for our NFP discount.
Please contact [email protected] to find out more.
Business / Instructor + Notifications
A:
Yes. If you add a client's date of birth they will receive a friendly email on behalf of your business. You can also be sent a reminder on the day of your clients birthday from the Settings > Notifications page. Clients can also add their date of birth on the registration form.
A:
Clients can choose what notifications they will receive from Bookamat
To view and customise these notifications, simply sign in as a client and go to Settings > Notifications. There you will see a host of settings that can be switched on or off depending on your preference.
Business / Instructor + Online Waivers
A:
Sure! Bookamat includes integrated online waivers complete with version control and history. That means you can update your waiver terms and know exactly which version each client signed.
When you create a new waiver, Bookamat will alert your clients to sign the latest version online. It's quick an easy for them, saves you time, and gives you complete peace of mind.
If a client hasn't registered yet, no worries! Simply send them the digital waiver directly from your Bookamat account.
To set up your digital waivers now, head over to the Settings > Waivers page of your business account and paste in your waiver and indemnity release text.
Business / Instructor + Pause / Modify Passes
A:
Credits can be paused and resumed at any time from the My Business > Credits
page. This is useful for when clients are temporarily unable to attend classes.
Or if you have to close your business temporarily.
Pausing credits prevents them from expiring and prevents them from being scheduled. When you resume a credit, Bookamat will automatically assign the correct future expiry date based on how long the pass was paused for.
Pause / Resume All Credits
To pause or resume all credits linked to your business account:
Step 1. Go to My Business > Credits
Step 2. Select ’Pause / Resume All’
Pause / Resume All Credits For Individual Clients
To pause or resume all credits linked to an individual client:
Step 1: Go to My Business > Credits and locate the client you want to pause credits for
Step 2: Select Options > View All Credits
Step 3. On their credits page select the ‘Pause / Resume All’ button
Pause / Resume Specific Credits For Individual Clients
To pause or resume specific credits for an individual client:
Step 1. Locate the client who's pass/pack you want to freeze
Step 2. Select Options > View All Credits
Step 3. Select Options > Freeze / Modify for the credit you want to freeze
Step 4. Select the 'Freeze the credit' check box (to apply a freeze just this credit / pass)
Step 5. Select the check box for 'Apply to all credits in this pack?' to freeze all credits in this pass / pack
Step 6. Select Update Credit to save
To resume a credit follow steps 1 - 3 and then un-check the 'Pause the credit check box'. Bookamat will automatically assign a new expiry date based on how long the credit was frozen for, but you can also set a custom expiry date.
Business / Instructor + Payment Plans
A:
Bookamat supports a host of flexible booking options and payment plans to suit businesses and their clients. All payment plans can be created for free or paid bookings.
- Drop In
- Allows clients to attend and pay for one booking only.
- Weekly Reservation
- Provides clients with a regular (recurring & reserved) spot in the same activity (day and time) every week until cancelled.
- Weekly is billed to the client each month based on either a flat rate (regardless of the number of activities), or per booking rate.
- Flat rate 'pro-rata' is also available.
- Pricing can also be set for clients who attend up to 5 sessions per week.
- Class Passes (Packs)
- Provides clients with a flexible booking option which is billed as a once off payment.
- Businesses can create customised packs of bookings which, when purchased, offer clients the convenience of being able to schedule bookings as and when they can attend.
- Unlimited passes are also supported allowing clients to book any number of activities (subject to availability) from when the deal was booked up until the end of the valid for duration.
- Memberships
- Create membership passes for any duration and link them to the services they should be valid for.
- Complimentary (Free) Credits
- Assign clients batches of complimentary credits to schedule as needed. Great for handling payments outside of Bookamat.
Business / Instructor + Payment Processing
A:
Bookamat has partnered with Stripe Payments, Square Payments and Peach Payments to enable studios around the world to accept online card payments for student bookings.
Our integrated online payment processing facility means your students can pay for their bookings using a credit or debit card from anywhere and enjoy instant booking confirmation!
Note there are additional fees for using online payment processing, see below.
Stripe Integration (42 Countries Worldwide)
Businesses in 42 countries can link their Stripe Payments account to Bookamat and receive their client online card payments directly into their bank account in as little as 3 business days.
To link your Stripe Payments account with Bookamat go to My Account > Stripe Integrations.
The cost for using this service is Stripe Payments + 0.30 (local currency cents) per transaction.
Square Integration (Australia)
Businesses in Australia can link their Square Payments account
to Bookamat and receive their client online card payments directly into their
bank account in as little as 3 business days.
To link your Square Payments account with Bookamat go to My Account > Square Integrations.
The cost for using this service is Square Fees + A0.30c per transaction.
In addition, businesses in Australia can choose not to link their own Square account and have Bookamat process their online card payments.
Online payments processed by Bookamat will be paid out to businesses, less the Square Fees + A0.30c per transaction fee, by the 10th day of each month.
To enable this service simply enable “Credit / Debit Card (Online)” from
the My Business > Billing > Payment Settings page.
Peach Payments Integration (South Africa & Namibia)
Bookamat has partnered with Peach Payments to offer online card processing for businesses in South Africa and Namibia.
Online payments processed by Peach Payments and Bookamat will be paid out to businesses, less a 5% booking fee, by the 10th day of each month.
To enable this service simply enable “Credit / Debit Card (Online)” from
the My Business > Billing > Payment Settings page.
Benefits Of Using Online Payments
1. Client bookings are immediately confirmed and automatically updated on the billing page meaning less work for you.
2. You will be immediately notified on every successful client payment.
3. Works in conjunction with prepaid bookings to ensure clients must pay at the time of making new bookings.
4. Allows clients to confirm their booking/s immediately giving them full control over rescheduling bookings if required.
5. Can be used in conjunction with Bookamat discount coupons.
Please note that online payment processing is optional.
A:
Where a client has requested a refund for any booking, or payment thereof, they should contact your businesses (through which the booking was made) to seek resolution. Bookamat does not provide a facility to refund or reverse client online card payments.
A:
If you are using Stripe and want to switch to Square payment processing (or vice-versa) you can disconnect your Stripe account from the My Account > Stripe page and then authorise your Square account on the My Account > Square page.
Please note that your client's bank cards will be linked to your old payment processing account and, as such, when you switch they will need to remove their card and re-add it in order for it to be linked to your new payment processing account. If you need help with this please contact us.
Business / Instructor + Payments
A:
Yes. Bookamat lets you choose what payments you want to accept including in-store payments.
A:
Yes. Bookamat allows you to receive and track EFT, cash and other payment transactions which take place between you and your clients.
A:
Sure! Simply add the link to your direct debit agreement to the My Business > Billing > Payment Settings page and enable it.
Your clients can then access your direct debit agreement during the booking process. After you receive confirmation of their direct debit service agreement being active, simply record their recurring booking as paid by direct debit on the Billing > Outstanding page.
Thereafter each new recurring booking for the client will remain in an unpaid state until you record it as paid.
A:
Sure. If you have a PayPal ID, e.g. https://paypal.me/... then you can enter it into the My Business > Billing > Payment Settings page of your account.
Your clients will then see that you accept PayPal when they are booking online and on their invoices. They will also be instructed to send you proof of purchase after making a payment via PayPal to you. You can activate the bookings before payment is received or wait for payment confirmation.

A:
Sure. Saved client payments can be reverted from the Billing > Received page or from the client's received payments account page. Reverting a saved payment will also reset the bookings for that transaction. Note this action reverts the record of the payment, not the actual money.
A:
Where you believe a payment has been processed in error, you must provide written notice to Bookamat within thirty (30) days after the date of payment specifying the nature of the error and the amount in dispute. If notice is not received by Bookamat within such thirty (30) day period the payment will be deemed final.
Business / Instructor + Payouts
A:
Bookamat has partnered with Square Payments and Peach Payments to offer integrated online payment processing to businesses. If enabled in your billing settings, clients will be able to pre-pay or post-pay for bookings using a debit or credit card via their Bookamat account. On successful payment, the bookings will be confirmed and a payment notification sent to the business and the client.
Bookamat processes payouts to businesses on a regular basis and provides a detailed transaction statement each month.

This service is optional and, if enabled, incurs an additional cost which is described on our pricing page. This service is currently only available in Australia, South Africa and Namibia.
A:
Bookamat aims to process all payouts with respects to online client card payments by the tenth (10th) working day of every month. Business account holders will also receive a Bookamat settlement notice with an itemised breakdown of the payments.
Payouts will be sent with reference Bookamat Settlement.
Business / Instructor + Prepaid Bookings
A:
Businesses can enable a prepaid timer which prevents clients from leaving bookings in their basket without paying for them.
When activated, clients will be required to pay at the time of booking using a credit or debit card. Any bookings which are not paid for within 30 minutes of being added to the basket will be removed. Recurring bookings can also be automatically removed on the 1st of each month if payment has not been received to save you time and hassle.
Note this feature is only available to businesses which have enabled Bookamat 'Credit / Debit Card' payment methods on their Billing > Payment Settings page.
Business / Instructor + Preventing Late Bookings
A:
Absolutely! We recognise that having a client book into an empty group class a few hours before it is due to start is not always an efficient way to run a business.
That's why you can tell Bookamat how far in advance to prevent bookings in empty classes to save you from running around. This setting can be found on the Settings > Booking Conditions page.
A:
Business / Instructor + Promoting Activities
A:
Social media sharing has been integrated with Bookamat to make it easier to promote your activities and get more bookings.
Go to your Schedule and select 'Options' for the activity you want to promote, then choose 'Manage Participants'. This will take you to a new page where you will see a 'Share' button that lets you post the activity directly to your Facebook, Twitter or Google+ feed.
Business / Instructor + Publishing Activities
A:
We offer businesses a complimentary business directory listing where classes can be made public on our https://bookamat.co/browse page. This is an optional service.
If you want to publish your business and classes to our directory, follow these steps:
Step 1. Ensure you have activities with free spaces in your schedule for the current month.
Step 2. Go to Settings > Booking Conditions and select 'Yes' to the option 'Publish my business and activities on the Bookamat home page?'
Step 3. Save Changes.
Step 4. Visit www.bookamat.co/browse
Step 5. Your activities are now published and ready to take new bookings.
A:
You can display a live and bookable 7-day rolling schedule on your website by embedding your live schedule link into an iframe in your website. You can find your live schedule link, and customise the colour of your live schedule, on the Settings > Links page of your business account.
The live schedule works with all site builders including Wordpress, Wix and Squarespace etc. If you need help please contact us.
Here is an example: https://bookamat.co/demo/schedule
A:
Yes. Each activity can be set to either private or public. To change an activities privacy setting go to My Business > Schedule > 'Options' > 'Manage Activity'. Change the Public/Private setting to 'Private' and select 'Update Activity'.
A:
Want to link your business website or Facebook page to your Bookamat schedule? No problems, follow these steps:
Step 1. Go to My Account > Account Details
Step 2. Scroll down to the Business Detail section and enter your website address in the 'Website Link' field
Step 3. Save Changes
Step 4. Voila! Visitors can now click through to your website.
Business / Instructor + Recording Attendance
A:
Yes. You can mark client attendance for every activity, report on client attendance and add notes to activities.

Note you can also set the default class attendance to Attended or Absent from the Settings > Booking Conditions page.
Related Documents:
Business / Instructor + Recurring Bookings
A:
Simply assign any recurring pack or pass to a client and Bookamat will re-book the same pass whenever it expires or runs out of credits. Bookamat will also send the client a notification about their new pass and that payment is required.
A:
Step 1. Go to the Service Manager and choose 'Add New Pricing'.
Step 2. Select the 'Credit Packs' pricing type OR the Weekly Reservation which will recur on a calendar month basis.

Step 3. Complete the form and save.
Step 4. Bookamat will automatically re-add this membership for the client whenever it expires or runs out of credits.
Business / Instructor + Referral Bonus
A:
Yes we do! We will send you a subscription discount coupon for every new business which lists you as their referral. We will send you the coupon after the new business pays their first month of subscription.
Business / Instructor + Registration
A:
If you would like to speak to us with regards to your registration, please contact us using the instant chat from our website or email [email protected] and we'll be in touch shortly.
Business / Instructor + Removing bookings
A:
Client bookings can be removed in any of the following ways.
If the pass or booking is unpaid:
1. To go Billing > Outstanding
2. Select Options > Write Off against the booking to be removed
3. Write off will remove any unpaid (or activated) bookings for the client and remove the outstanding amount
If the pass or booking is already paid for:
1. Go to the Credits page and select Options > View All Credits for the desired client
2. Select the credits to be removed and confirm
If the bookings are already scheduled:
1. Go to Clients and select Options > View Account for the desired client
2. Go to Scheduled Bookings and then select View Activity for the desired booking
3. Select Options > Remove and confirm
Business / Instructor + Reports
A:
Bookamat currently includes the following reports.
1. Activities Report for tracking the performance of your activities.
2. Attendance Report for analysing client attendance.
3. Client Report for client list management.
4. Commission Report for calculating staff pay per class commission earnings.
5. Packs Report for tracking clients with valid active packs.
6. Payout Report for tracking online payments processed by Bookamat.
7. Payroll Report for calculating staff payroll and performance.
8. Sales Report for tracking sales transactions.
9. Transactions Report for tracking sales per payment channel.
10. Weekly Report for tracking clients with valid weekly reservations.
Business / Instructor + Security
A:
Business / Instructor + SMS & Email Notifications
A:
We will be adding global SMS notifications soon.
A:
Step 2. Compose your email.
Step 3. Send yourself a test email.
Step 4. Send the email to your client list.
Clients who do not wish to receive emails from your studio will be able to unsubscribe.
Business / Instructor + Staff
A:
There is no limit to the number of staff/instructors/teachers you can have on Bookamat.
A:
Yes. Each staff member can be set up to receive booking notifications about the activities they are teaching/hosting.
Step 1. Go to My Business > Staff.
Step 2. Select 'Edit' against the staff member you want to assign notifications for.
Step 3. Select 'Yes' next to 'Receive notifications?'
Step 4. Select 'Save & Close'.
Staff members will receive the following notifications about their activities:
- New client bookings.
- Client payments.
- Client reschedules.
- Client credits.
- Client waiting list acceptance.
- Client cancellations.
A:
Yes! Each staff member (teacher or instructor) can sign in using their own instructor account allowing you to keep your important account holder data secure.
To invite staff to create their own account go to My Business > Staff > Options > Instructor Login.
Instructor accounts can view all classes they have been assigned to teach, plus record class attendance for those classes.
A:
Sure! Each staff member can have their own short teacher bio which will be displayed on your live schedule and in the client app.
To add a staff bio go to My Business > Staff and choose Options > Edit Biography.
You can also display a staff member profile picture with the bio. To upload a staff photo go to the My Business > Staff > Options > View Account > Profile tab.
A:
Sure! Bookamat helps with calculating staff commission rates.
Two options are currently available, a fixed commission amount per activity taught, or a % commission per booking. To set the rate each staff member should earn, go to My Business > Staff and select the ‘Commission Rates’ button.
To see the commission rates earned per date period, go to Reports > Commission (or select the Commission Report button from the Staff page).
Business / Instructor + Staff Notifications
A:
Step 1. Go to the My Business > Staff page and select Options > Edit Staff Member

Step 2. Toggle the notifications setting to yes and save.

Staff members will now receive email notifications about the activities they are linked to including new bookings, reschedule and cancellations.
Business / Instructor + Streaming Classes
A:
Bookamat allows you to take bookings and payments for classes streamed on platforms like Zoom etc. Simply enter the streaming link into the Broadcast Link (Schedule > Options > Broadcast Link) field to share it with your students.
This works with free and paid streaming services including Zoom, YouTube, Google Meet, Skype Conference Call and many others. Other things you can do with the broadcast feature include:
1. Add notes to let participants know about what equipment to bring or about passwords etc.
2. Set your streaming link to be recurring for the activity series.
3. Send a online class reminder 1 hour before class starts which includes the link and notes.
4. Specify which participants should receive the broadcast link and notes (all, paid only or none).
5. Allow participants to access the recording of the class after the class has ended.
6. Send the broadcast link (including notes) instantly to all participants at any time.

A:
Here's how to continue to offering your students in-person studio classes, while also offering bookings via an online streaming link.
Go to My Business > Service Manager > Locations and add a new location called "Online Classes" or "Online Streaming".
Step 2. Add A New Service
Go to My Business > Service Manager > My Services and add a new Service called "Yoga Online Classes" or "Pilates Online Mat Classes" for example. Include in the service description information about the service being an online streamed class and that the streaming link will be provided to students on booking confirmation.
Step 3. Create A New Pricing
Go to My Business > Service Manager > My Services and add a new Pricing option for your online service called "1 Online Pass" for example. Your new service and pricing should look similar to this example.

Step 4. Add A New Activity
Go to My Business > Schedule and select Schedule New Activity. Fill in the form for the new online service assigning up to a maximum of 200 class spaces and scheduling the online class at the same time as your normal studio class so they overlap. Note to allow overlapping / concurrent activities to be taught by the same teacher, go to Settings > Booking Conditions and allow overlapping activities.
Step 5. Add A Broadcast Link
Go to My Business > Schedule > Options > Broadcast Link and paste in the unique live streaming (or pre-recorded video) link, e.g. from YouTube, Zoom, Google Meet, Skype Conference etc, for each class.
Student Bookings For Online Classes
Students can browse your classes like they normally would and filter by online or studio classes.

When confirming a booking to an online class students will see the service description you added.

Students will receive the link when they confirm their booking via their Bookamat account and in their email booking confirmation.

Business / Instructor + Subscriptions
A:
1. Register your business to get a complimentary 14 day free trial period.
2. After 14 days, your free trial will continue so long as you maintain 10 or less active clients booked into classes in any given month.
3. Your paid subscription billing period will commence from when you exceeded 10 active clients for a period of one month, e.g. 5th Jan to 5th Feb.
4. The total monthly subscription amount due will be based on your number of active clients for that month. We provide a cost calculator on our pricing page and on the My Account > My Subscription page.
5. Your subscription can be paid using a credit or debit card from the My Account > My Subscription page. You will have 5 days to pay for your subscription before we will restrict account access.
6. You can download your current and past invoices from the My Account > My Subscription page.
If you are having trouble paying your subscription please contact us.
A:
When you register a new Bookamat business account you'll enjoy our unlimited free trial. As long as you sign into your account once a month, and you have 10 or less active clients, then your free trial will continue indefinitely. Plus there are no obligations to continue and you can cancel at any time.
Your paid subscription will only commence once you have added 11 or more active clients into classes.
A:
You may cancel your Bookamat subscription at any time by contacting us.
Following any cancellation by you, you can continue to use Bookamat until the end of your current subscription.
Online payments collected by us via our Square or Peach payments processing facilities which are due to you will be paid into your nominated bank account by the tenth (10th) business day of the following month.
A:
By using Bookamat you are indicating your agreement to our Terms & Conditions. If we do not receive your payment when it is due, we reserve the right to disable all or part of your Bookamat services.
A:
If you need to pause your subscription please contact us.
Failure to log into your account for more than 30 days may result in your account data being deleted.
Business / Instructor + Support
A:
We take customer support seriously and aim to provide the best support possible. We provide priority email and live chat support for our subscribers.
Business / Instructor + Switching to Bookamat
A:
Switching to Bookamat from another booking system doesn't have to be a daunting task. We've helped many studios make the change. Here are our basic rules to help to make a smooth transition.
Export data as CSV or Excel from your old booking system:
1. Your client data including client name, email address, phone number, date of birth and notes.
2. A report on the number of visits remaining for each client / student.
Preparation:
1. Register your business on Bookamat and set up your services and pricing (My Business > Service Manager).
2. Import your client data (My Business > Clients > Import Clients).
3. Set a launch date, e.g. the first day of a new month, from when you'll start using Bookamat.
4. Cancel the subscription with your old booking system.
5. Let your clients know that you will be switching to Bookamat.
6. Assign clients who have visits remaining from the old system with carry-over credits in Bookamat (My Business > Credits > Assign Complimentary Credits).
7. Invite clients to join you on Bookamat (My Business > Clients > Email Options > Invite All Clients).
Business / Instructor + Video On Demand
A:
While it is possible to provide paid link access to video libraries or pre-recorded content using Bookamat, we do not currently provide tools to create video libraries.
There are many amazing services for creating video libraries. Here are a few options which you might find useful:
Vimeo On Demand: https://vimeo.com/ondemand/startselling
Woocommerce for Wordpress: https://woocommerce.com/
Wix Video: https://www.wix.com/app-market/wix-video/features
Business / Instructor + Waiting Lists
A:
Bookamat supports unlimited use of automated waiting lists. Using the business account you can reschedule client bookings into waiting lists, plus you can accept/reject waiting list spots. Clients can also join waiting lists and will be automatically notified, and can accept, if a space becomes available.
Related Documents:
A:
If you have added waiting list spaces to your activities/classes, then when that activity becomes fully booked your clients (or you) will be able to schedule their credits into the waiting list.
If a space opens up in the class, any clients on the waiting list will be notified via email about the opportunity to join the class. The first client to accept the space will have their credit moved into the class while the others will stay on the waiting list for the next opportunity.
If no spaces open up for that class then any client on the waiting list will be automatically re-credited their booking which they can reschedule from the following day.
To see who is on a waiting list you can view the Manage Participants or Attendance Form pages from your Schedule.
Please note that it is not possible for clients to join the waiting list without a credit. Some systems allow non-paid members to join waiting lists but we give preference to your paid members.
Business / Instructor + Weekly Reservation
A:
Our amazing weekly reservation pricing has been designed to save you and your clients time. It's the perfect solution when reservations are essential!
Why is it amazing?
- 1. Bookamat secures the client into the same class spot each week until cancelled (set and forget)
- 2. Clients pay per calendar month (e.g. at the beginning of each month, else risk losing their reservation)
- 3. Clients pay based on how many classes are in the month, or a based on fixed monthly rate (you choose)
- 4. Set optional reduced rates for clients who reserve 2 - 5 classes per week (e.g. $10 per class for 1 class per week, $9 per class for 2 classes per week etc.)
Plus you can also set up:
- • Auto-reminders for clients on weekly reservations to pay for their upcoming classes at the end of each month
- • Auto-removal of any unpaid weekly reservations on the 1st of each month
- • Auto-notifications for clients whose weekly reservation are removed due to non-payment
- • Auto debit (client's can enable from their account)
- • Minimum commitment period to lock clients into a minimum number of payments
Got a query about how to set up weekly reservation pricing for your business? Drop us an email so we can help!
A:
Step 1. Go to My Business > Service Manager and select 'Create New Pricing'.
Step 2. Ensure the correct Service is selected and select 'Weekly Reservation' for the Pricing Type

Step 3. Add a 'Pricing Name' e.g. Weekly Reservation
Step 4. 'Billing Cycle' is fixed to calendar month which means clients are billed per calendar month
Step 5. 'Recurring' is also fixed to yes since this is a recurring pricing plan
Step 6. Choose how long the credits given to clients on the Weekly Reservation pricing should be 'Valid For'. E.g. if a client can't attend one of their classes, then you might like to allow them up to reschedule it into another class up to 2 months into the future.
Step 7. The 'Rate' is the amount a client will be changed for attending the same class each week. You can also choose whether the client should have to pay this rate as a fixed monthly rate (flat rate) or on a per booking basis.
8. The 'Multi Weekly' section lets you set a different rate for clients who attend 2, 3, 4 or 5 classes per week on the weekly reservation. For example:
• $50 per class for 1 class per week (base rate)
• $47.50 per class for 2 classes per week (a $5 client saving per week for attending 2 classes per week)
• $45 per class for 3 classes per week (a $15 client saving per week for attending 3 classes per week)
Step 9. If you your require to clients make a minimum number of payments before they can cancel this plan, enter this number in the 'Commitment' field
Step 10. Select which staff members should be authorised to offer this rate to clients (e.g. select all staff if anyone can offer this rate.)
Step 11. Select "Create New Pricing"
A:
Step 1. Go to My Business > Schedule
Step 2. Select Options > Add Participant for the class which you want to start the clients weekly reservation booking
Step 3. Locate the client (scroll or name search) then select the round check box in the attending column against their name
Step 4. A list of your pricing will appear including your weekly reservation
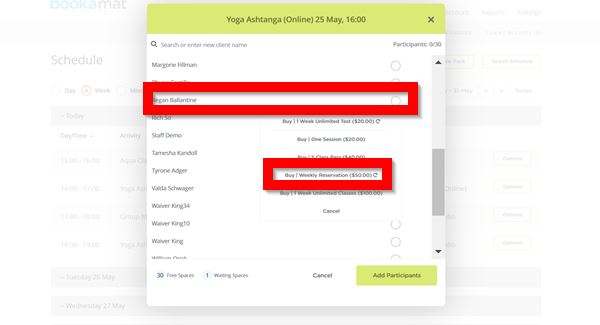
Step 5. Select the Weekly Reservation option and then 'Add Participant'
Step 6. The client is now reserved in this same class every week.
Step 7. Go to the My Business > Billing > Outstanding page to check the amounts owing, upcoming months etc
Business / Instructor + Why choose us?
A:
1. Bookamat launched in 2016 and is now trusted by a global community of Pilates, yoga and other fitness professionals.
2. Bookamat is easy to set up and lets you start taking bookings and payments online in minutes.
3. We are the only booking system to offer pricing based on active clients to save you money during quieter months.
4. We don’t lock you into lengthy contracts and you can cancel at any time.
5. We offer personalised service and support.
6. We listen to our clients and often incorporate their feedback into new releases.
7. We maintain one platform which works across all devices giving you total control and flexibility over your studio.
8. We don't expose your clients to your competitors promotions.
9. We reward our loyal customers and offer a referral program which you can benefit from.
10. We are committed to helping your business grow!
Business / Instructor + Client / Student + Mobile Apps
A:
We love simplicity and always strive to do more with less. Using this approach we have been able to ensure our clients and their customers get the very best Bookamat experience on any internet enabled mobile, tablet or desktop device using browser enabled web apps.
To install Bookamat as a web app on your phone, simply visit bookamat.co using Chrome or Safari and, when prompted, select 'Install App' or 'Add to Home Screen'.

If you selected 'Ignore' or declined the invitation to install the app we won't ask you again for 14 days. If you should want to install the app before we ask again, you will need to clear/reset your browser cache and then visit https://bookamat.co again.
Bookamat also has a desktop web app which you can read more about how to install on our blog
Client / Student + About
A:
"I love Bookamat because it saves me time and means I don't have to bother my teacher! 10/10"
Bookamat is your gateway to browsing, booking , paying and managing your classes and activities online.
Things you can do with Bookamat:
✅ Add your upcoming bookings to Google Calendar
✅ Book on behalf of friends or family
To get started, create a free account in one of the following ways:
1. Browsing and making a new booking
2. Searching for the name of the business you want to join
3. Request an invitation by contacting the business
Client / Student + Activated Bookings
A:
The "activated" label next to your bookings on the Basket page means that the business hosting your classes has allowed you to access and reschedule your credits prior to receiving your payment.
You can check any amounts owing on the basket page of your Bookamat account.
Client / Student + Basket
A:
If you are familiar with online shopping sites or ticketing websites, you'll find that our basket works in a similar way. You can add any number of new bookings to your basket and review them before proceeding to the payment page.
Once your bookings have been successfully paid, they will be moved to the My Bookings or Credit page of your account.
Please note that not all businesses using Bookamat allow online card payments. If card payments are not available as a payment option, please follow the instructions for alternative payment options and wait for your bookings to be confirmed.
Client / Student + Bookings
A:
1. Sign into your Bookamat account
2. Select the 'New Booking' button (on desktop, tablet or mobile)
3. Browse the class schedule for an activity to join and choose 'Confirm'
4. If you have a credit to schedule Bookamat will allow you to select 'Use Credit'
5. If you don't have a credit, you will need to buy a new pass by choosing a payment plan and selecting 'Add to Basket'
6. Review the payment options on the Basket page
7. Your booking/s will confirmed (and credits available) after your payment has been confirmed
For queries about bookings or payments please contact the business which is hosting the activities.
A:
Casual bookings are for when you want to attend one activity or session only, or attend on a pay-as-you-go basis. People usually book these when they want to try a new activity before committing to a longer term arrangement.
A:
Weekly reservation bookings are for when you want to commit to attending the same activity (day and time) every week indefinitely. Payment is due on a calendar month basis and amounts may vary depending on whether the business charges a flat monthly rate or a per booking rate.
A:
Credit packs (1 Pack, 4 Pack, 10 Pack etc) are for when you want the flexibility of being able to schedule bookings as and when you can attend them.
A:
Unlimited bookings, popular with yoga and dance studios, allow you to book any number of activities (subject to availability) from when the deal was booked up until a set expiry date.
When you book and pay for an unlimited pack, you will receive a credit booking called 'Unlimited Pack' on your client account credit page. This credit can be rescheduled repeatedly for the duration of the deal.
A:
If you are on a recurring payment plan (indicated by a circular arrow), Bookamat will re-book the same plan for you whenever it expires or runs out of credits. You will be notified when the new pass has been added.
A:
A:
If you fail to arrive for your scheduled activity you will lose your booking for that activity. Remember you can prevent losing your booking by using Bookamat to reschedule your booking outside of the businesses late cancellation rule. If you believe you have grounds to request a late cancellation, please contact the business with which the bookings were made.
A:
If you know you are going to miss your activities for an extended duration, please contact the business where the sessions were booked and notify them to make an arrangement.
A:
If you wish to stop attending your activity, you can remove them from Bookamat via the basket page or contact the business where the bookings were made to have them removed for you.
Before stopping, please contact the business where you were attending the activity directly to notify them. Many businesses require a month’s notice so please ensure that you are familiar with their terms and conditions.
A:
If you believe you have made an honest mistake, please contact the business/studio where the booking was made to enquire about options.
A:
When you see "flexi-use" bookings, it means they can be re-scheduled into activities (as displayed) other than the activity being booked. For example, if you make a booking for Pilates which has a flexi-use of Yoga, it means you can also schedule the Pilates booking/s into a Yoga class if you want to.
A:
Bookamat only lists the activities each business makes available. If you are having trouble finding an available activity to join, please contact the business directly for assistance.
For technical assistance please contact us.
Client / Student + Cancellations
A:
In the unlikely event that your activity or session is cancelled you will receive a cancellation notification by email and the business offering the activity may contact you to make alternative arrangements.
If you had already paid for that class, you will receive a credit which can be rescheduled.
Client / Student + Discount Codes
A:
Go to your basket page and select "Credit / Debit Card (Online)". You will then be able to enter your discount code in.
Client / Student + Forgot Password
A:
To reset your password, sign in as a client then select the 'Forgot Password' button and follow the prompts.
Client / Student + Friends & Family
A:
Yes! You can buy passes for, and book on behalf of, your friends and family members.
Step 1. Sign in to your client account and go to the My Account > Relationships page.
Step 2. Select 'Add New Relationship' and fill in the form then save. Note that you will be the designated payee for any relationships you create.

Step 3. Now when you buy a new pack or pass, you will be able to choose who the attendee is (who the pass will be for).

Step 4. The pack will be added to your basket and after payment has been confirmed, you will be able to schedule the credits on behalf of the attendee.

A:
A:
When you add a relationship you become the designated payee for the relationship.
If you no longer wish to be the payee for the relationship then you can remove them from your account by going to My Account > Relationships > Options > Remove.
Client / Student + Notifications
A:
Yes. To receive notifications for upcoming activities and expiring credit bookings, sign into your account and go to My Account > Notifications.
Client / Student + Online Classes
A:
Many businesses are now offering classes on Bookamat via online streaming. Bookings for online classes work in much the same way as bookings for in-person classes:
1. Browse for the session you want to join
2. Choose a pricing option to add to your basket
3. Make payment
After payment has been confirmed, you will be sent an email containing the online class link. Note that you may be required to install 3rd party streaming software to be able to join the online class depending on the streaming service the business or studio is using.
Your online class link will also be displayed on your Bookamat My Bookings page as per the example below. If you do not see the link it usually means the business or studio has not yet uploaded the link for that class or session yet.
We will also send you the link to your online classes 1 hour before the scheduled start time of the session.
Client / Student + Online Payments
A:
Bookamat has partnered with Stripe Payments, Square Payments and Peach Payments to enable you to pay for bookings safely and securely online. No credit card details are stored on Bookamat servers. You will be shown the valid payment options for the business you have booked classes with during the booking process.
Benefits of Online Payments:
1. You only need to add your debit or credit card details once
2. Bookings are confirmed immediately and moved to the booked page where they can be rescheduled
3. There is no additional cost to you
4. It's safe, quick and secure
5. Discount coupons are supported
A:
- You haven't exceeded your daily card spend limit.
If you are still unable to process payment, please try to remove your card and re-add it.
Lastly there may be times when the online card payment facility is unavailable due to circumstances out of our control. We apologise in advance for any inconvenience this causes and ask that you come back later and try again. If the problem persists please contact us. If the booking is urgent, please contact your studio directly.
Client / Student + Payments
A:
Bookamat provides a platform for businesses to choose the payment methods they want to accept. You will be shown the accepted payment methods for the business you have booked with during the booking and payment process.
A:
1. Sign in to Bookamat
2. Go to My Account > Card Management
3. Select 'Remove' for the card you want to remove
4. Confirm that you want to remove the card
A:
If the business you are booking with supports EFT and cash payments you will be shown these options during the booking process. Cash or EFT payments must be paid directly to the business where the bookings were made.
A:
Bookings for which payment is overdue will remain on the basket page until payment has been received by the business offering them. Note that businesses may also cancel or remove any bookings with overdue payments at their own discretion.
Client / Student + Refunds
A:
If you believe you are entitled to a refund please contact the business through which the classes in question were booked.
Client / Student + Registration
A:
Yes.
A:
If the studio or business you want to join is publicly listed, you can go to the top of this page and select 'Find My Studio' then follow the prompts.
If the studio or business you want to join has chosen to not be publicly listed, please contact them directly ask them to send you an email invitation.
A:
Client / Student + Rescheduling
A:
Firstly cancel the recurring booking for the activity you want to finish by signing into your client account and going to My Bookings > Basket and removing the reservation. Secondly select 'Book New Activity' and book a new recurring spot in the activity you want to join.
Note that if you have already paid for the month and want to swap your paid bookings, you will need to reschedule each booking from the My Bookings > Booked page into the desired activity before following the above instructions.
A:
If you can't find an activity to reschedule your booking into it could be because:
1. Your booking is about to expire and can't be rescheduled beyond it's expiry date.
2. There are no free spaces for the activities you are looking for.
3. You are already a participant in the activities you are searching for (you can't double book a class).
4. The booking can't be rescheduled within [x] hours of the start of the said activity (each business sets their own late cancellation policy).
If you still believe you should be able to reschedule your booking, please contact the studio/business where the booking was made.
Client / Student + Waiting Lists
A:
Paid bookings can be rescheduled into any activity waiting list when available. If you have joined a waiting list, Bookamat will notify you via email before the scheduled start time of the activity should a vacancy become available. The email will give you two options, either to 'Check Vacancy' or 'Reject' the offer.
Select "Check Vacancy" if you wish to accept this activity. You will be taken immediately to the Bookamat website where we will confirm if the space is still available and if so, your booking will be confirmed.
Click 'Reject' or ignore the email if you wish for your booking to be credited back to you.
If you do not get offered a vacancy for the activity, your booking will be automatically credited back to you at the end of the day.
Alternatively you can also manually accept a waiting list vacancy by using your client account and selecting the wait listed activity and choosing ‘Accept Wait List’ once a vacancy is available.
Client / Student + Wallets
A:
To accept a wallet transfer:
- Sign into your Bookamat client account
- Go to My Account > Wallet
- Open the 'Money Received' heading
- Select Options > Accept Transfer'
- Confirm
Your wallet balance will now show the money received.